
Google Chrome is by far the most popular browser on the planet. I mean the browser has captured more than 65% of the market share which is something quite phenomenal. While the browser works like a charm right out of the box, there are certain hidden settings and features that can make your experience even better. In this article, we are going to take a look at all those hidden settings that you should change to make Chrome better for you. So, here are the 15 Chrome settings that you should change:
Chrome Settings You Should Change
Since Google Chrome is available both as a desktop and a mobile browser, we have split this article into two sections to make it easier for you.
Chrome Desktop Settings You Should Change
1. Assign Keyboard Shortcuts for Extensions
One of the biggest reasons behind the popularity of Chrome is the huge extension support which allows users to modify Chrome and grant it more power. While by default, Google Chrome makes it very easy to access your extension gallery, if you want to make the process even more friction-less, you can assign keyboard shortcuts to your favorite extensions. For example, if you are using “Pocket” as your read it later service, you can assign a keyboard shortcut which can save articles into Pocket.
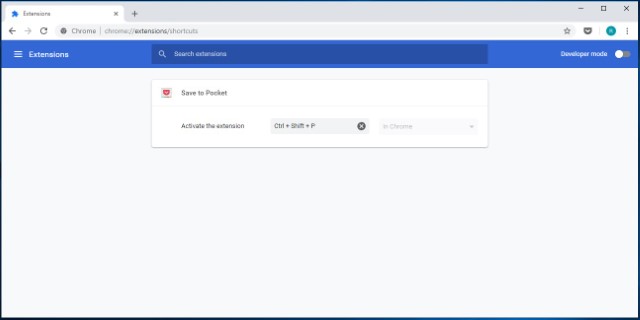
That’s just one example to show you what you can do with keyboard shortcuts. To set up keyboard shortcuts for Chrome extensions, first go to the extension shortcuts page (chrome://extensions/shortcuts) and type in your keyboard shortcut for different extensions. This one setting has made my life so much easier with Chrome and I think you are going to enjoy this too.
2. Allow Extensions in Incognito
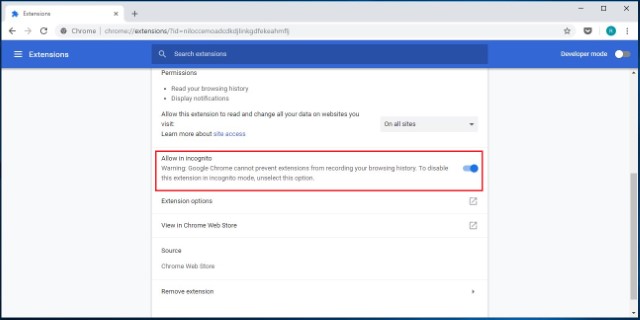
While we are talking about extensions, there’s another setting that you should know about. Have you ever browsed the web in “incognito” mode and wondered where all your extensions are? Well, by default, Chrome doesn’t allow extensions to work in incognito as you don’t want any service to track you in that mode. However, if there is an extension that you cannot use Chrome without, there is a way to allow extensions in incognito mode.
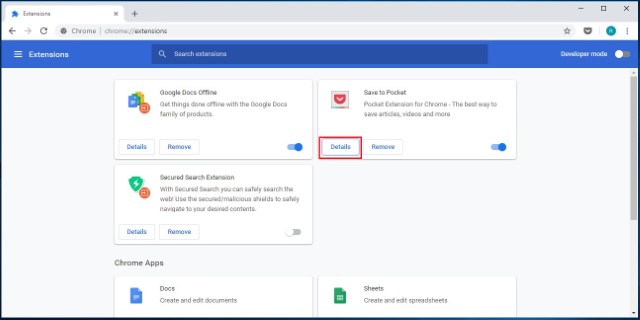
To do that, open the extensions manager page (“chrome://extensions/”) and then click on the “Details” button of the extension that you want to use in incognito. Now, find the “Allow in incognito” option and enable it by clicking on the slider button.
3. Stop Chrome from Running Background Apps When It Is Closed
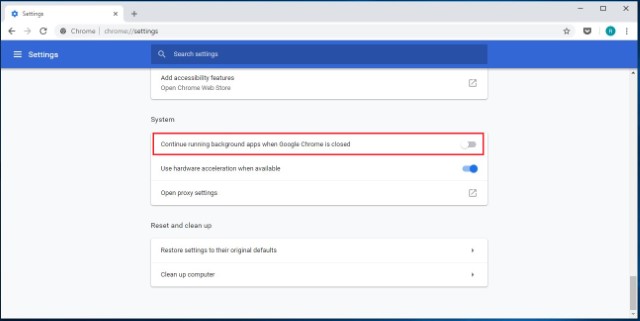
Not many people know this but by default, Chrome runs all its apps in the background. That is not acceptable as I don’t want Chrome to run anything once I close the app. Thankfully, there’s a setting that you can disable to stop this from happening. To do that open Chrome and then go to Settings -> Advanced, and disable the “Continue running background apps when Google Chrome is closed” option. This will save you both battery and system resources when you are not using Chrome.
4. Disable Adobe Flash
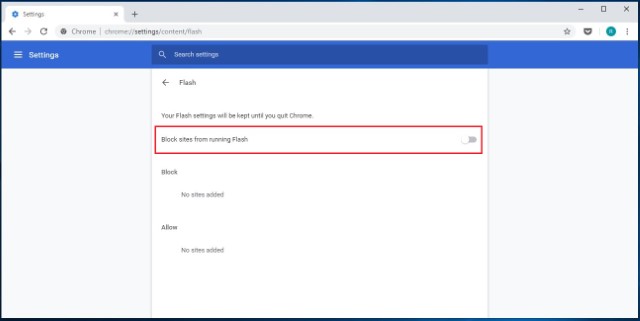
Adobe Flash is an archaic software that should have been dead by now, however, thanks to thousands of websites that are still using it, it’s still alive and strutting along. Google has taken action as the Chrome browser now asks you before running Flash by default, however, it’s still not good enough. There is a high-security risk that comes with running Flash and if you value your data and online security, you should permanently disable it. To disable Flash on your Chrome browser, go to the Flash settings page (chrome://settings/content/flash) and then disable it by turning off the toggle.
5. Add/Remove Payment Methods
Whenever you use a credit or debit card to make a purchase online using Google Chrome browser, it asks you to save that information to make check out easier the next time. Well, most of us knowingly or unknowingly agree to save that information in Chrome which is a problem if your device is used by anyone other than you too. Even if you are the sole user of your device, you should keep an eye on the payment information that Chrome has on you and delete the ones that you don’t want Chrome to have.
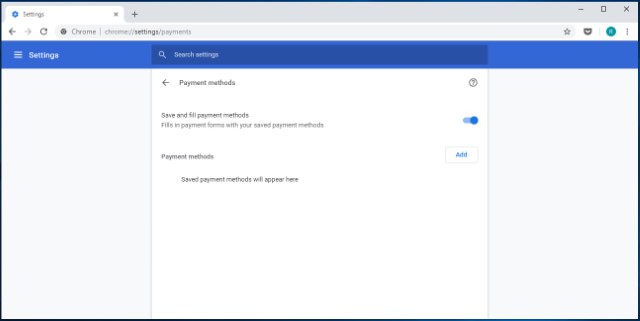
On the contrary, you can also add payment methods if you want to make future online purchases easier. Whether you want to add or remove payment details, the point is that you should know about this setting. To manage your payment methods, go to the payments page on Chrome (“chrome://settings/payments”) and check out all the saved information. Here you can click on the “Add” button to add new payment methods or disable the “Save and fill payment methods” option to disable the same.
6. Manage Addresses
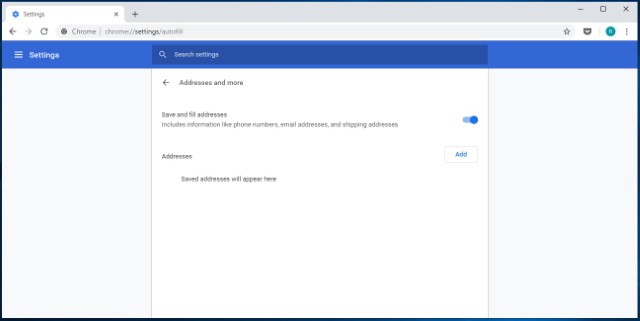
Similar to payment information, Chrome also saves other autofill details to make form filling easier in the future. The saved information include your addresses, phone numbers, and more. However, a lot of time, Chrome fills out incomplete or incorrect addresses. If you want to fix this, you can simply head over to “chrome://settings/autofill” and remove the incomplete or incorrect addresses, while adding the correct and complete addresses so Chrome autofills the correct address next time you’re filling out a form.
7. Enable Guest Profile to Browse the Web More Privately
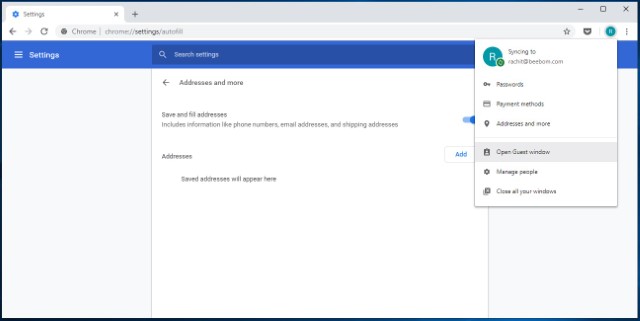
If you are browsing the internet on a public or friend’s computer and want to maintain your online privacy without losing out on any feature, creating a guest profile is a great option. When you browse the internet using a guest profile, the pages that you view do not appear in the browser history and they don’t leave other traces, like cookies, on the computer after you close all open Guest windows. Moreover, Guest profiles don’t get access to your personal data, so the websites you visit with the Guest profile won’t get any access to any of your personal data either, which is an added bonus.
To browse Chrome in Guest mode, just click on the profile icon at the top right and click on the “Open Guest Window”. Once you are done browsing the internet, just close all the Guest windows and your browsing information will be removed.
8. Disable Notifications for All Sites to Block Annoying Pop-ups
One of the most annoying things about browsing the internet is that most websites want to send notifications to you and prompt you with a pop-up whenever you visit them. That’s very annoying and becomes a real problem when you mistakenly allow a website to send you notifications. Well, this setting will not only prevent sites from sending you any notification, but it will also prevent any future pop-ups asking your permission to enable notification.
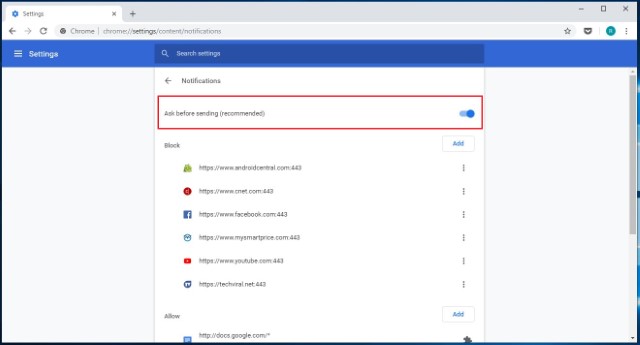
To disable notification for all sites to block annoying pop-ups, just go to the Chrome’s notification page (“chrome://settings/content/notifications) and then disable the toggle next to “Ask before sending (recommended)” option.
Chrome Mobile Settings You Should Change
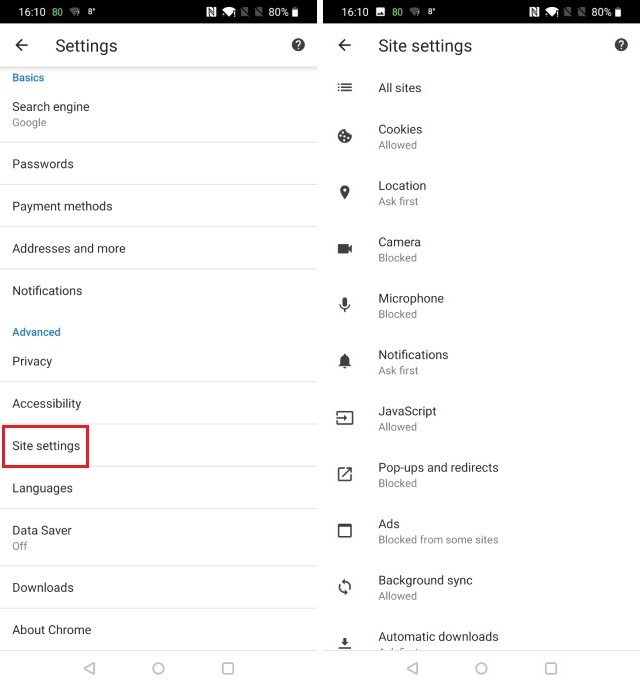
1. Manage Site Permissions
Our mobile devices hold a lot of personal information including our location, microphone and camera access, and more, and chances are you don’t want your phone to share that data with websites. That’s why it’s important that you manage permissions given to different websites and revoke access to things that you are not comfortable sharing with websites. To manage site permissions, click on the three-dots menu and then go to Settings -> Site Settings and click on individual options to see and deny permissions for things that you don’t want websites to access.
2. Turn On Safe Browsing
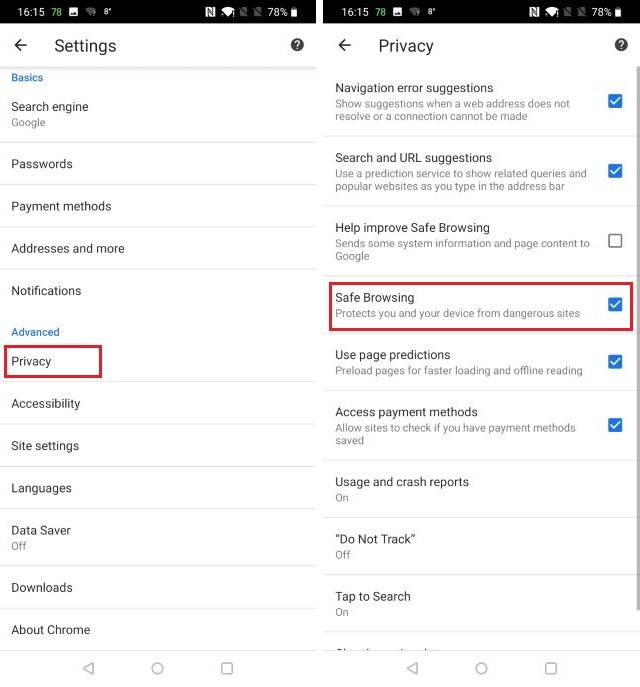
The internet is filled with malicious websites and you can never be too careful while surfing the web. Thankfully, Chrome has a built-in safe browsing option which allows it to block the websites that it deems unsafe. Everyone should enable this setting if they want to enjoy the internet without the fear of malicious attacks. To enable this setting, just go to Settings -> Privacy and turn on the “Safe Browsing” option.
3. Disable Usage Report Sharing
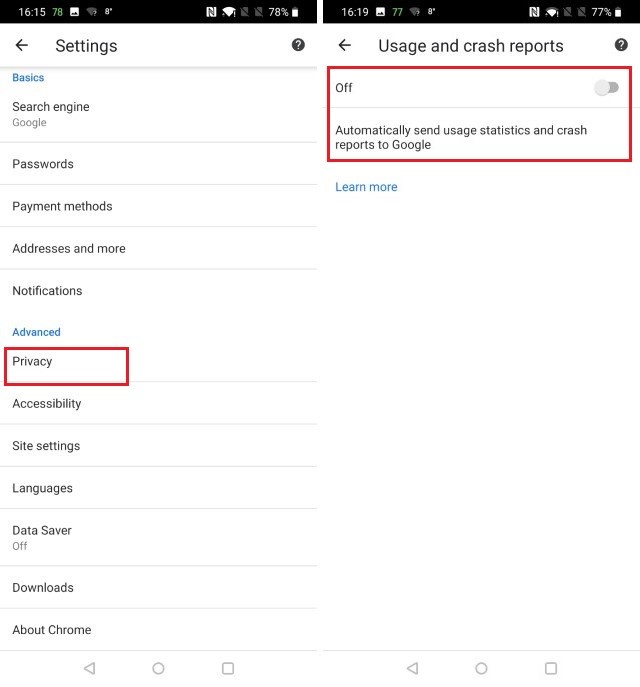
By default, Chrome sends your usage reports to Google to make the browser better in the future. And while the data is anonymized to safeguard your privacy, you can disable the sharing all together if you want to be even more careful with what data Google can collect from you. To disable usage report sharing with Google, go to Settings -> Privacy -> Usage and crash reports and turn it off.
4. Add Websites to Home Screen
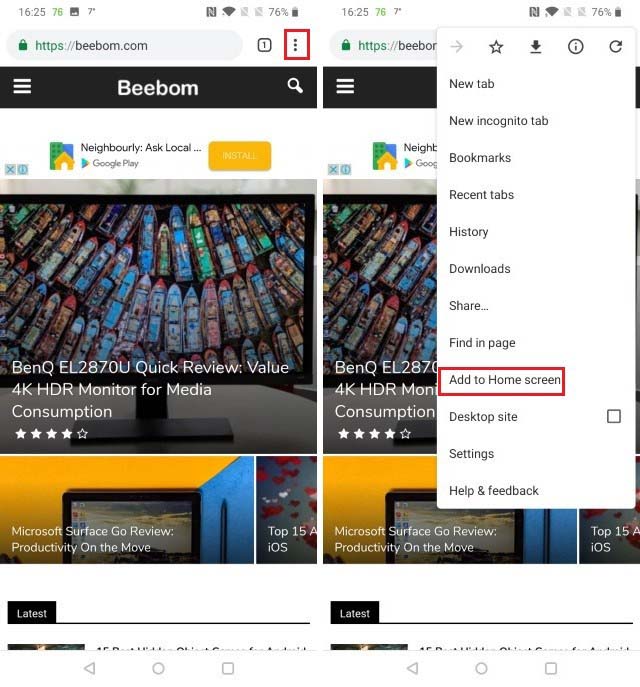
This is more of a trick than a Chrome setting that you need to change however it is very useful so I couldn’t stop myself from including this on the list. If there is a website or list of websites that you like to visit regularly, Chrome allows you to access them instantly by creating home screen shortcuts. To create these shortcuts, first, visit the website that you want to create the shortcut for and then tap on the three-dot menu. Here, tap on the “Add to Home screen” option to create your shortcut. Repeat this for every website that you want to add to your home screen.
5. Change Default Search Engine
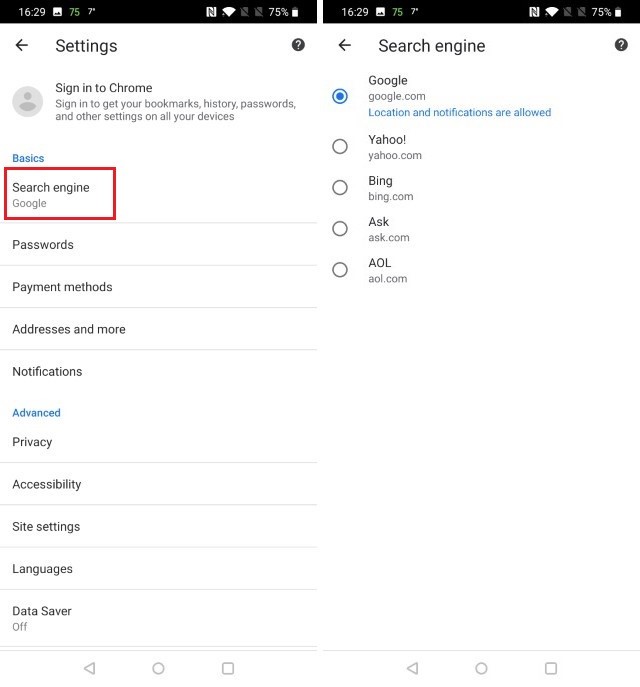
While Google is by far the best search engine on the market right now, there are people who prefer to use alternate search engines for personal reasons. Well, if you are one of them, you can do that by opening Chrome on your mobile device and then going to Settings -> Search engine and then choosing from the list of available options.
6. Turn Autofill On/Off
Another Chrome mobile setting that you should look at is the autofill setting which allows Chrome to autofill things like passwords, addresses, payment information, and more. Whether you want Chrome to have access to all this information is your choice and you should definitely check out the settings. To see your autofill preferences open Settings and under “Basics” check out the “Passwords”, “Payment methods”, and “Addresses and more” options. Here you will find your saved information, along with a toggle for auto-filling the data in websites. You can just turn this toggle off to disable autofill in Chrome mobile.

7. Turn on Data Saving
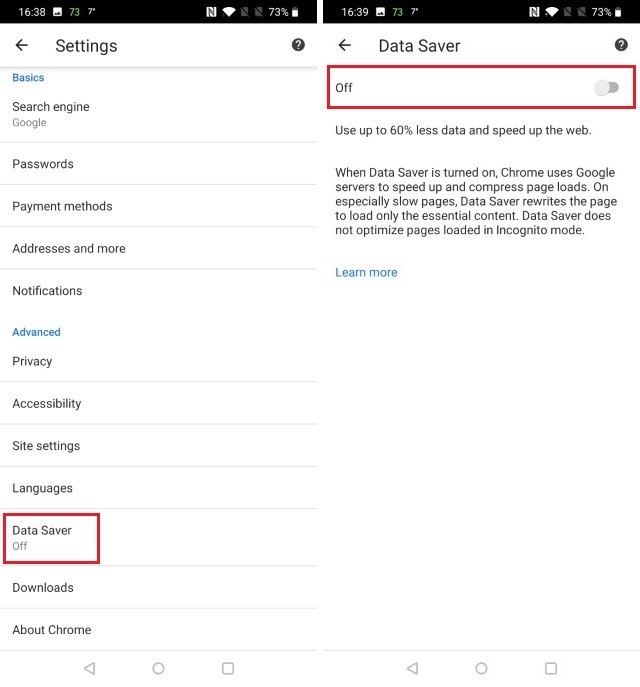
Most of us are on a limited data plan on our mobile devices and hence it’s necessary to save data wherever it’s possible. Thankfully, Chrome has a data saving setting which when turned on results in 60% less data consumption. To enable this setting go to Settings -> Data Saver and turn on the toggle.
Bonus
While the above fifteen are the main Chrome settings that we want you to look at there are a couple of extra settings that you should also pay attention to:
1. Create Shortcuts for Websites You Visit Often
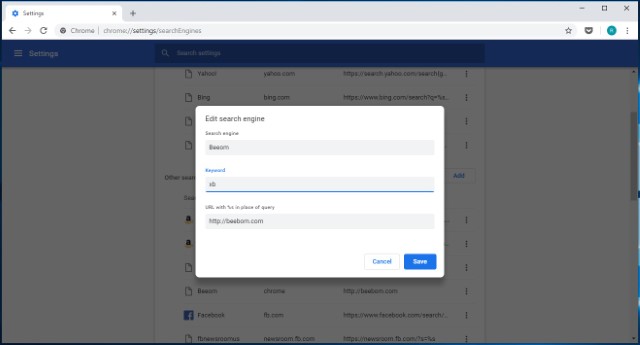
Chrome Desktop browser allows you to create shortcuts for the websites that you want to visit. For example, When I type in the shortcut “xb” in my Chrome’s browser and hit enter, it opens our own website. To create and save these shortcuts just go to the search engine settings page on Chrome (chrome://settings/searchEngines) and click on the “Add” button next to the “Other search engine” menu. Here, enter the name of the website in the first field, the shortcut you would like to use in the second field, and the URL of the website in the third field. Once you added all the information, click on the “Add” button to add the shortcut.
2. Search Your Email Directly from the Address Bar
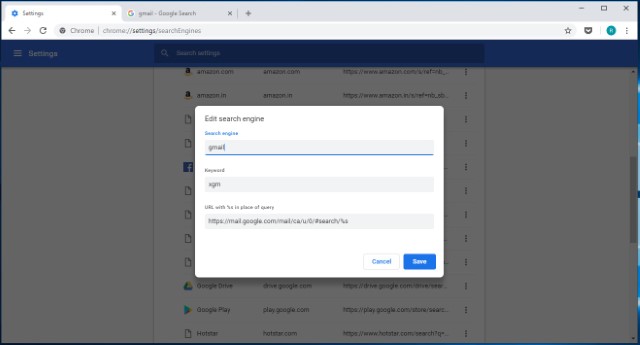
Using the above process you can also create a custom search for Gmail account which will allow searching for emails directly from the browser’s URL bar. To add this custom search bar, just like before, go to the add page and enter the name (use Gmail as we are creating a search for Gmail) in the first field and the shortcut in the second field. Now, in the last field, you will have to add a custom Gmail search URL which is given below.
https://mail.google.com/mail/ca/u/0/#search/%s
Finally, click on the “Add” button to add this custom search. Now, whenever you want to search for an email, just type your custom shortcut and hit either the tab or the space button. Now type your search query and hit enter again to get the search results.
SEE ALSO: How to Fix DNS_Probe_Finished_Nxdomain Error in Google Chrome
Take Control of Google Chrome with These Awesome Settings
That ends our article on the most important Google Chrome settings that you should change to get the most out of the Chrome browser. If you have any problem in managing any of the settings mentioned on this page, let me know in the comments section below and I will help you out. If there’s an important Chrome setting that we have missed and you would like to share with us, drop it down below too.
from Beebom https://beebom.com/chrome-settings-change/

No comments:
Post a Comment