![How to Start Windows 10 in Safe Mode [Updated]](https://beebom.com/wp-content/uploads/2019/06/How-to-Start-Windows-10-in-Safe-Mode-Updated.jpg)
Windows 10 is a great operating system with plenty of features. It comes with decent malware protection and has several security safeguards. However, the lack of sandboxing and abundant use of third-party programs make the OS vulnerable to unidentifiable attacks. In such cases, we have to use Safe mode on Windows 10 to inspect and cleanse our PC from harmful programs. If you are facing a similar situation and want to know how to start Windows 10 in Safe mode, you have come to the right place. Here, I have discussed everything from basics to advanced methods to boot Windows 10 in Safe mode. So without further ado, let’s get started.
Start Windows 10 in Safe Mode
In this article, we will learn how to start Windows 10 in Safe mode, for both functional and non-functional PCs. If your PC is booting fine then you can easily start Windows 10 in Safe mode. However, if Windows 10 is not booting at all and showing a blank screen then there are two neat ways to start the PC in Safe mode. You can jump through the section to find a desirable solution. Now having said that, let’s begin the guide for working PCs first.
Start Windows 10 in Safe Mode [For Working PCs]
If your PC is working fine and you want to start Windows 10 in Safe mode then follow the steps mentioned in this section. All four methods are pretty easy and straightforward so you will not have any issues booting Windows 10 into safe mode. With that being said, here we begin.
1. Press Shift and Restart Your PC
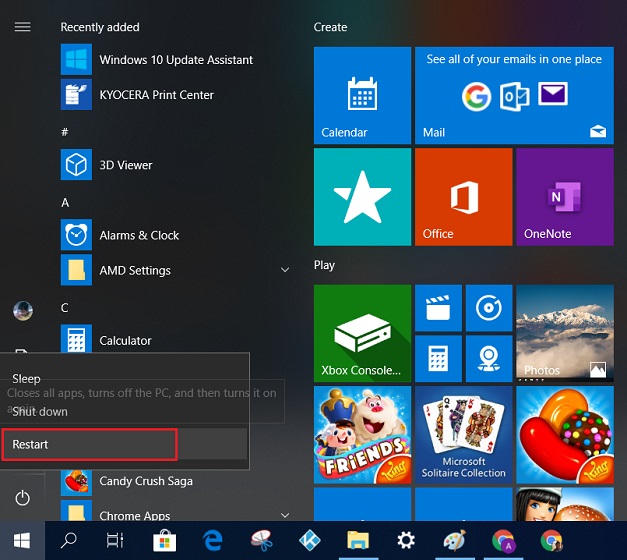
1. This is the easiest way to start Windows 10 in Safe mode. Just open the Power menu and press the “Shift” key while clicking on the “Restart” menu.
2. The PC will restart to “Choose an Option” screen. Here, click on the “Troubleshoot” menu.
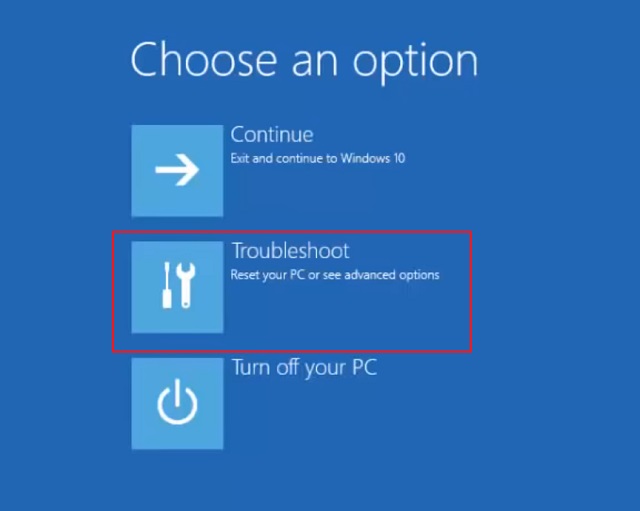
3. If your PC is not booting into “Choose an Option” screen then go back to the Windows sign-in screen and restart the PC while pressing the “Shift” key.
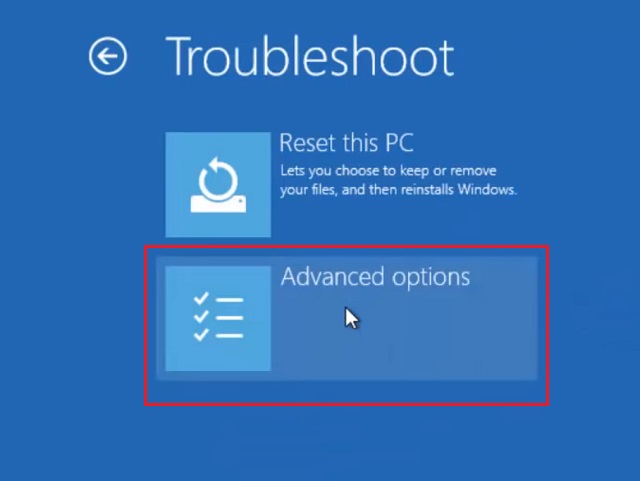
4. On the next screen, click on the “Advanced Options”.
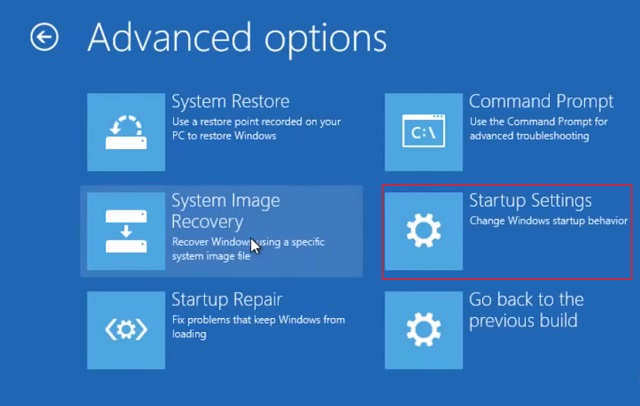
5. Now, click on “Startup Settings”.
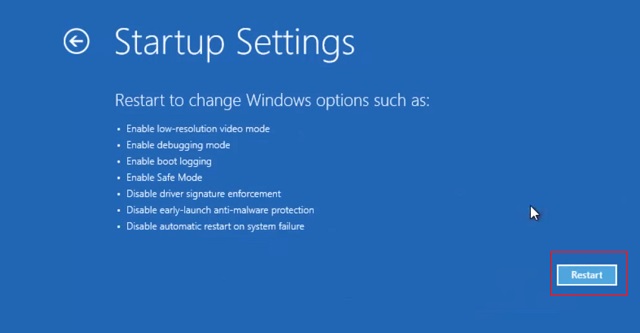
6. Here, click on the “Restart” button to boot into the Startup menu.
7. Finally, you will see the option to boot into Safe mode. Press “4” or “F4” key to boot into Safe mode. If you want internet access in Safe mode, press “5” or “F5” key.
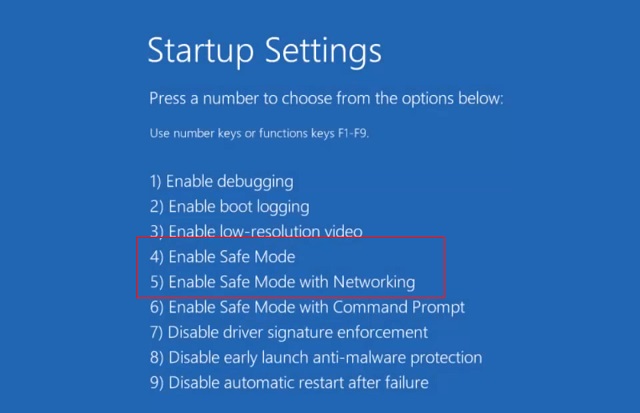
8. The PC will reboot again and it will start Windows 10 in Safe mode. Now you can go ahead and inspect your PC.

9. To get out of the Safe mode, simply restart and you will be back in the normal mode.
2. Advanced Startup
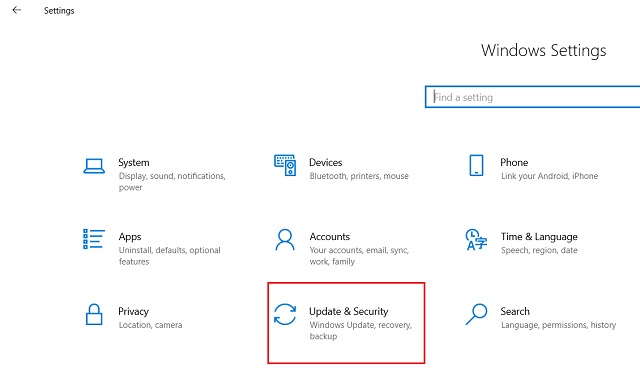
1. You can start Windows 10 in Safe mode through Advance Startup as well. Just press “Windows” and “I” keys at once to open the Windows Settings. Here, click on “Update and Security” menu.
2. After that, switch to the “Recovery” tab and click on the “Restart Now” button under Advanced Startup.
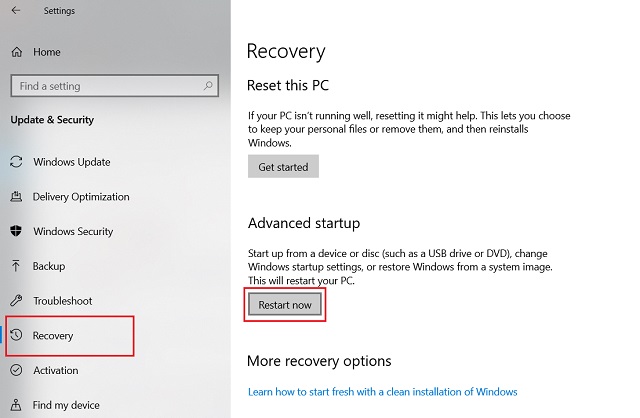
3. Your PC will restart to “Choose an Option” screen. From here on, you can follow the similar steps shown in the above section. Finally, Windows 10 will start in Safe mode.

3. Configure the Boot Menu
1. You can configure the Boot menu to force Windows 10 to start in Safe mode. All you have to do is press “Windows” and “R” keys simultaneously to open the Run window. Here, type “msconfig” and hit enter.

2. A System Configuration window will open. Here, switch to the “Boot” tab and enable the checkbox for “Safe Boot”. Finally, click on the “Ok” button and close the window.
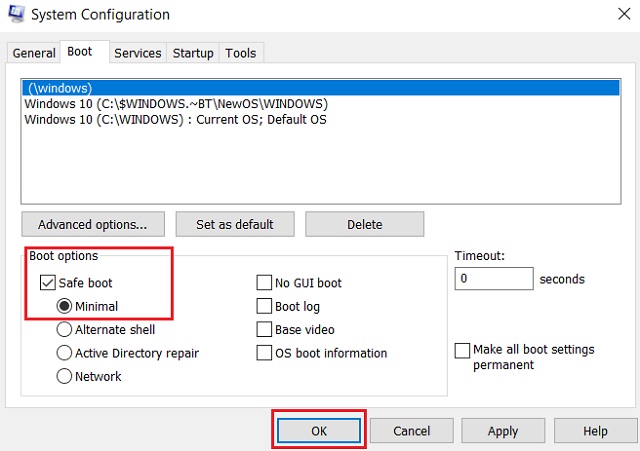
3. In a few seconds, a prompt will appear asking you to restart Windows 10. Just click on the “Restart” button and your PC will instantly restart and boot into the Safe mode.

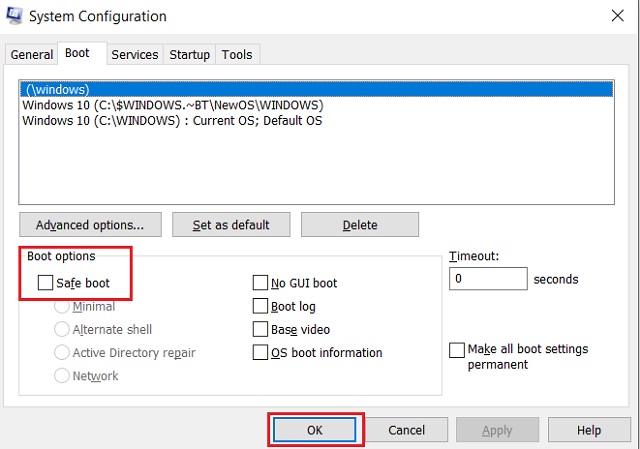
4. In case you want to go back to the normal mode, open the System Configuration window again in Safe mode and uncheck the “Safe Boot” option. Further, click on “Ok” and restart your PC. Now, Windows 10 will boot into the normal mode.
4. Press the F8 Key
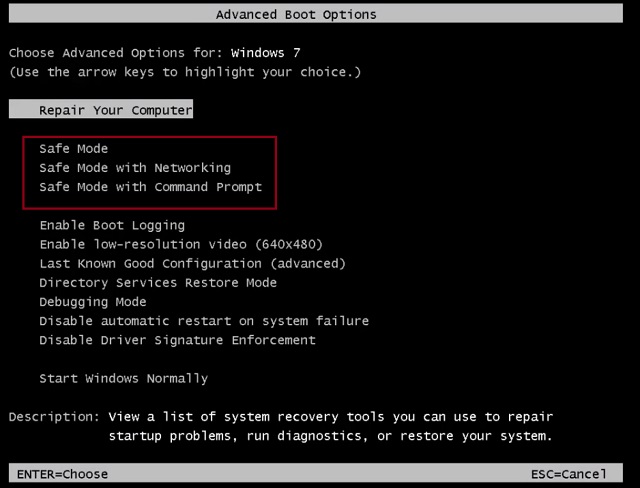
In earlier versions of Windows, pressing the F8 key while booting Windows would open the startup menu. From there, you could easily boot into the Safe mode within seconds. It was the easiest and best way around to boot into the Safe mode. However, with the release of Windows 8 things changed and now the F8 key functionality has been deprecated. Nevertheless, there is a neat way to enable booting into Safe mode through the F8 key. It works just like before and it’s awesome. Here, I am going to show you how to get it back.
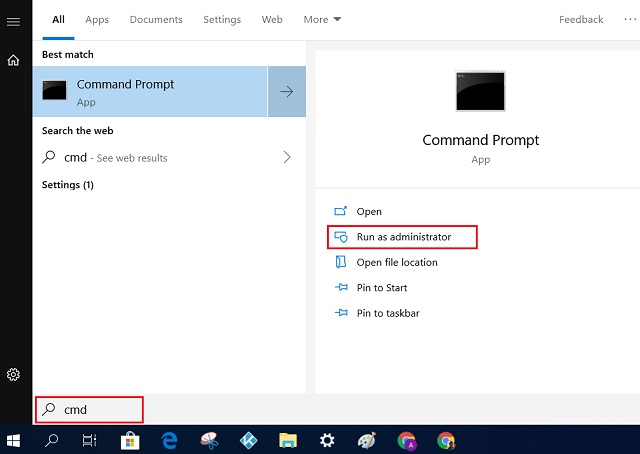
1. Press the “Windows” key once and type “cmd”. Command Prompt will appear in the search result. Simply click on “Run as Administrator” in the right pane. After that, it will prompt you to confirm your action, click on “Yes”.
2. Now just copy the following command and paste it in the Command Prompt window. After that, hit enter and the changes will be made.
bcdedit /set {default} bootmenupolicy legacy
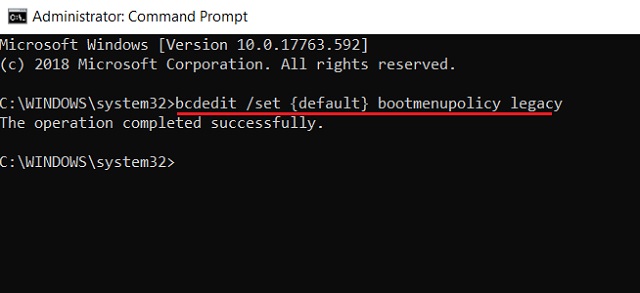
3. Now, restart your PC and press the F8 key while booting, you will be greeted with Advanced Windows Startup menu. From here, you can easily start Windows 10 in Safe mode.
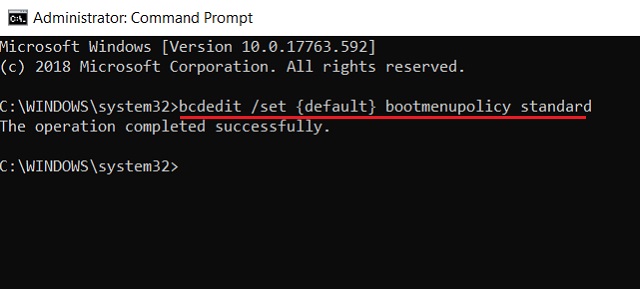
4. In case, you want to revert the changes, open Command Prompt again and paste the following command. Now, hit enter and the F8 key functionality will be disabled.
bcdedit /set {default} bootmenupolicy standard
Start Windows 10 in Safe Mode [For Non-functioning PCs]
If your PC is not booting and keeps throwing a blank screen then you will have to take another route to start Windows 10 in Safe mode. In some cases, rogue programs take over the crucial resources of the computer and impair the operating system from running properly. To disable these programs and services, you will have to boot into Safe mode through the Windows recovery environment. In this section, I am going to show you how you can start Windows 10 in Safe mode on non-functioning PCs.
1. Interrupt the Normal Boot Process
Yes, you read that right. In order to trigger the Windows recovery environment(winRE), you must interrupt the normal boot process by turning off the PC and turning it on for three consecutive times. winRE automatically kicks in whenever it finds there is a problem with the startup process. Here, I will show you how to do it.
1. Turn on the PC and wait for the loading Windows screen to appear. After that, press the power button for straight 10 seconds to turn off the PC forcibly.
2. Again, turn on the computer and turn it off similar to the above step. Repeat the same steps one more time.
3. Following three consecutive interruptions, turn on the PC again. This time the PC will boot into Windows recovery environment. At first, it will try to repair the computer by itself. so wait for some time.

4. In case, winRE fails to repair the computer, it will provide you an “Advanced Option” to repair the PC. Click on it and it will lead you to “Choose an Option” screen.

5. From here on, you can easily boot into the Safe mode. I have shown the complete steps with screenshots in the first section above so check that out. Anyway, you can follow this path to find the Safe mode option.
Troubleshoot -> Advanced Options -> Startup Settings -> Restart -> Press “4” or “F4” key to boot into Safe mode.
2. Use a Windows 10 Installation Disc or a Bootable Thumb Drive
If the above method didn’t work or your PC is not even booting or showing any sign of life then follow this method. You will need a Windows 10 installation disc or a bootable thumb drive. If you have no idea how to create a bootable USB, follow our tutorial here. Having said that, let’s begin with the steps.
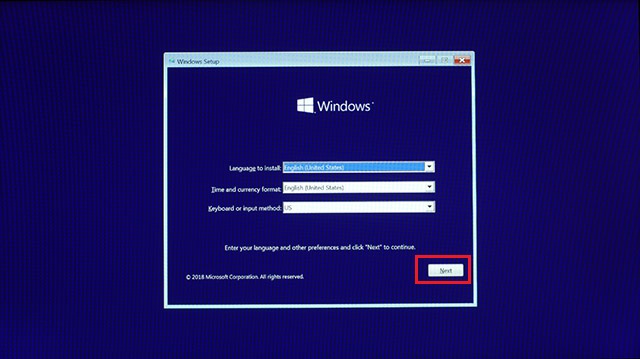
1. Insert the Windows 10 installation disc or a bootable thumb drive on your PC. After that, turn on your computer. Your computer should detect the external Windows installation source. You will see something like this.

2. After that, an installer window will appear. Select your language, country, and keyboard layout and click on the “Next” button.
3. Here, click on “Repair your computer” located at the bottom.

4. Finally, it will open “Choose an Option” menu. Here, click on “Troubleshoot”.

5. On the next screen, click on “Advanced Options” and then open “Command Prompt”.
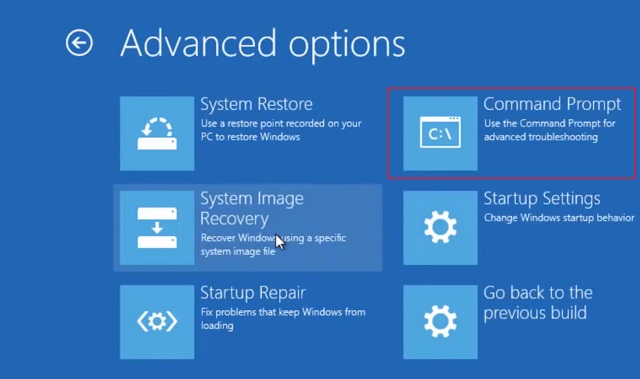
6. Here, type the following command and hit enter. It will force Windows 10 to boot into the Safe mode by default.
bcdedit /set {default} safeboot minimal
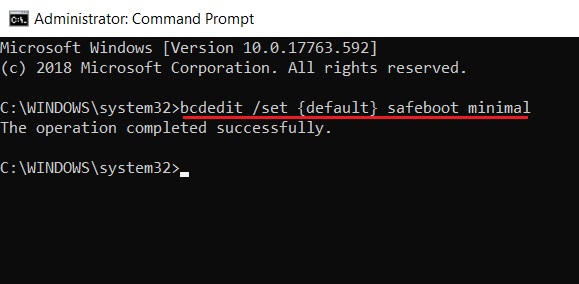
7. After that, close the Command Prompt window and go back to the “Choose an Option” screen. Here, click on “Continue” to start Windows 10 in Safe mode.
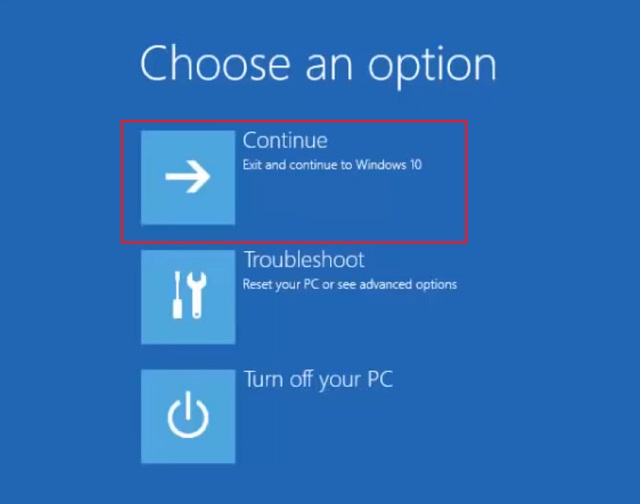
8. Your PC should boot fine into Safe mode. Now, you can cleanse your PC from rogue programs and viruses.

9. In case, you want to move back to the normal mode, open Command Prompt again by following the same process mentioned above. After that, type the following command and hit enter. This will reset the boot menu to normal mode.
bcdedit /deletevalue {default} safeboot
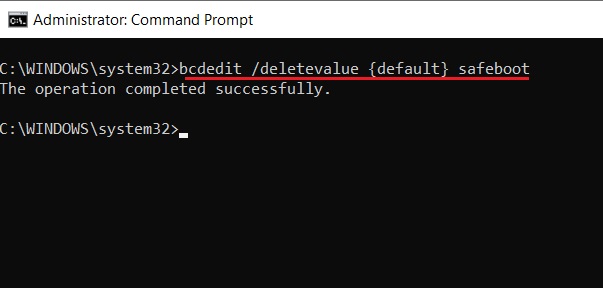
10. Now come back to “Choose an Option” screen and click on “Continue” to boot into the normal mode. That’s it.

SEE ALSO: How to Speed up Windows 10 in 2019 [Effective Methods]
Start Windows 10 in Safe Mode and Fix Your PC
So that was our detailed guide on how to start Windows 10 in Safe mode. The process is pretty straightforward if your PC is working fine. However, if you are facing problems booting into your Windows 10 PC, then I have shared two alternate methods which can save your day. Nevertheless, you can go through all the options and choose the one that you find convenient. In case, your PC is still not booting to Safe mode, you can comment down below with your questions. We will be happy to take a look.
from Beebom https://beebom.com/start-windows-10-in-safe-mode/

No comments:
Post a Comment