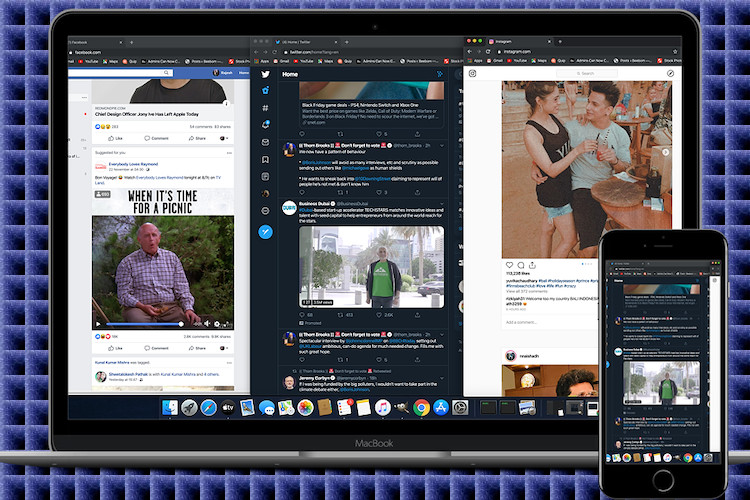
In the backdrop of rampant hacking and ever-mounting data tracking, an additional layer of safeguard for sensitive information against unauthorized access has become indispensable. Of course, nothing can guarantee a full-proof shield against hackers these days. However, it always pays to have some extra cushion under the hood to prevent the unexpected from turning out to be a reality, doesn’t it? So, if the security of your major social accounts has been giving you sleepless nights and you don’t want your personal data to easily fall into wrong hands, make the most of two-factor authentication. If you don’t know where to begin, here is a rundown to help you enable two-factor authentication on your Facebook, Instagram, and Twitter.
Set Up Two-Factor Authentication for Facebook, Instagram, and Twitter Accounts
So, How Does 2FA Work?
For those unfamiliar, 2FA adds an extra layer of shield to your account. Thus, even if someone is able to steal your password, the master key will still be with you. Once you have set up 2FA for your social accounts, the respective app will send you a verification code on your registered number or the authenticator app to verify the login attempt – every single time.
So, if someone wants to break into your account, they must require the access of not only your ID, password but also the registered phone number/authenticator app i.e Google Authenticator (free for iOS and Android) or the security key depending on whatever verification method you have chosen. To prevent account hacking, today most apps offer two-factor authentication.
And most of them work almost the same way (check out their respective settings > security/privacy). In this guide, we are just going to focus on setting up 2FA for Twitter, Facebook, and Instagram accounts. That all being said, let’s get started!
Turn on Two-Factor Authentication for Facebook
On iOS and Android Device
Note: Steps are almost the same for both iOS and Android. So, you shouldn’t have any problem going through them regardless of which side of the stream you belong to.
1. On your mobile device, open Facebook > tap on the More button (three horizontal lines) and then head into the Settings.
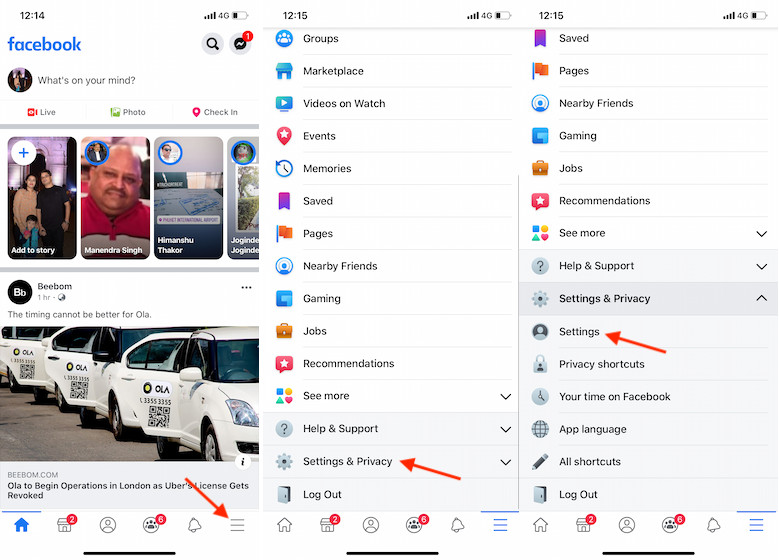
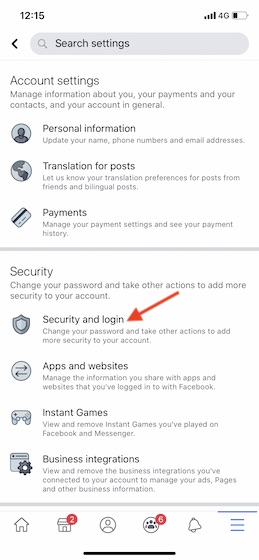
2. Under the Security section, tap on Security and login option.
3. Now, tap on Use two-factor authentication and hit Get Started on the next screen.
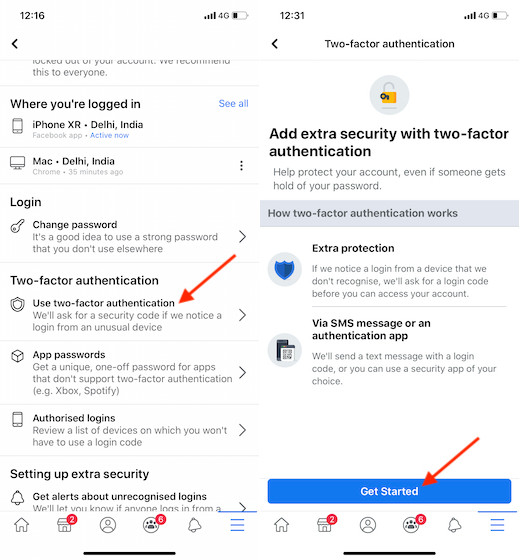
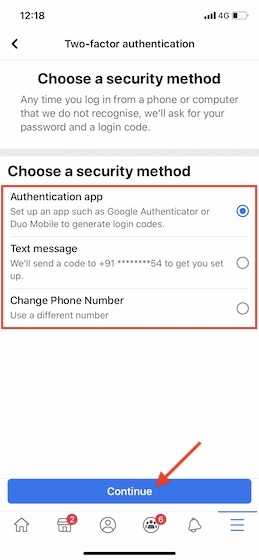
4. Then, choose a preferred security method and tap on Continue. Next up, follow the instructions to set the two-factor authentication for your Facebook account.
On Web
1. Open a web browser on your computer and head over to facebook.com. After that, sign in to your account and click on the tiny downward arrow at the top right corner of the screen. Then, choose Settings in the menu.
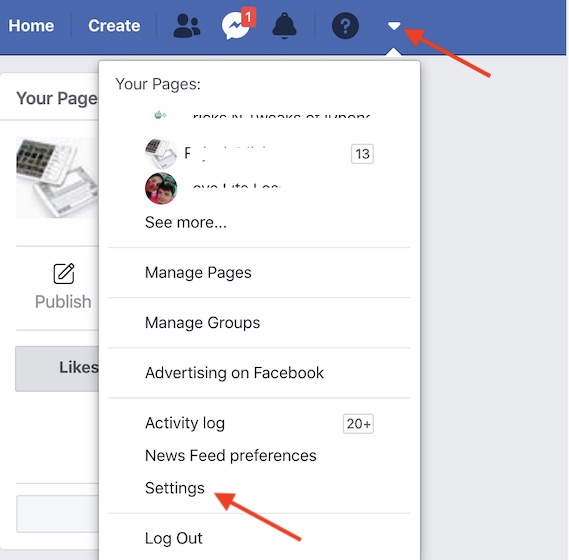
2. Under the General section in the sidebar, click on Security and login.
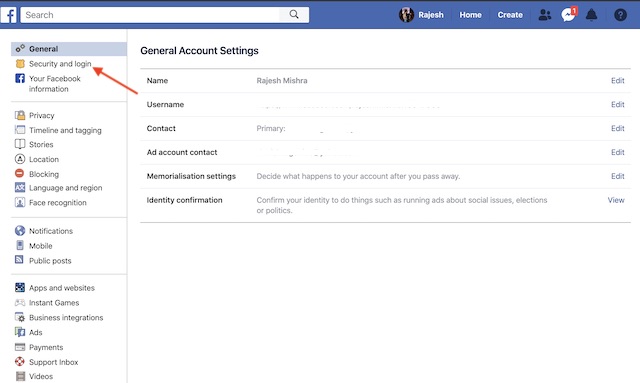
3. Next, click on Use Two-Factor authentication.

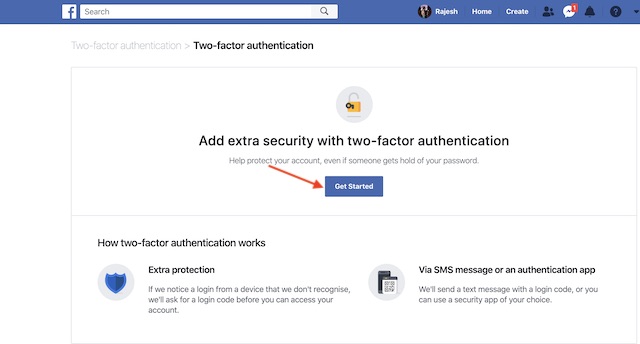
4. Next up, click on Get Started and then follow the instructions to set up two-factor authentication for Facebook.
If you like this tip check out our in-depth article on other cool Facebook tricks and tips that can help you use Facebook in a useful and fun way.
Set Up Two-Factor Authentication for Instagram
On iOS and Android Device
1. Open the Instagram app on your mobile device > tap on the profile tab and then head into the Settings.
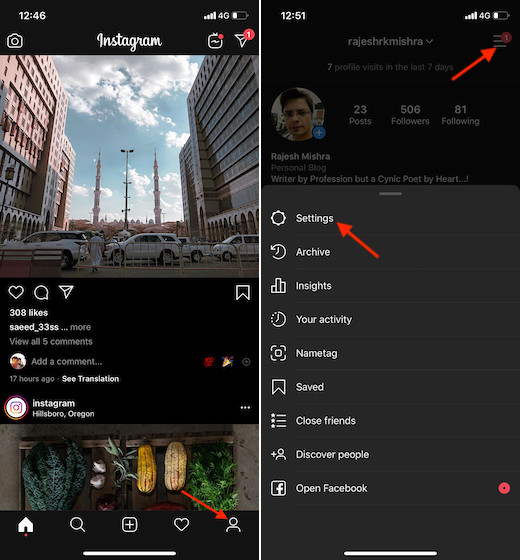
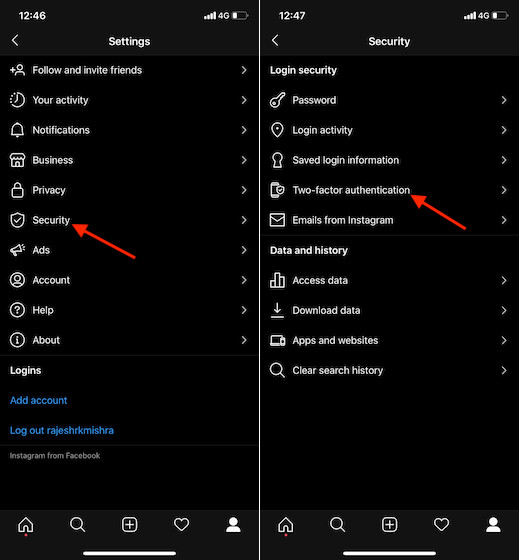
2. Now, tap on Security and choose the Two-factor authentication option.
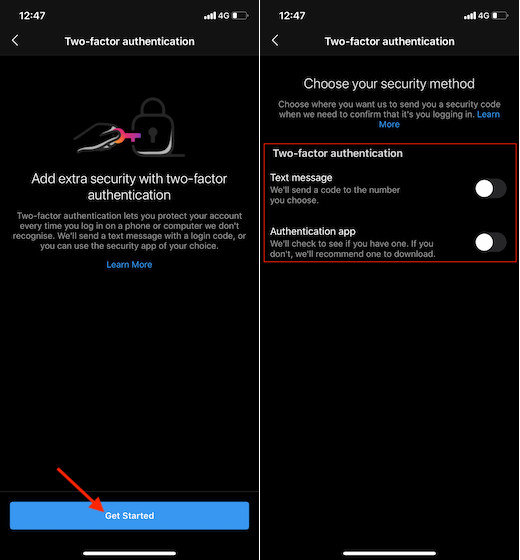
3. Next, tap on the Get Started and then choose your desired security method as per your convenience. After that, follow the instruction to enable the two-factor authentication for your Instagram account.
On Web
1. Open a web browser on your device and head over to instagram.com. After that, log in to your account and then click on the profile tab at the top right corner of the screen.
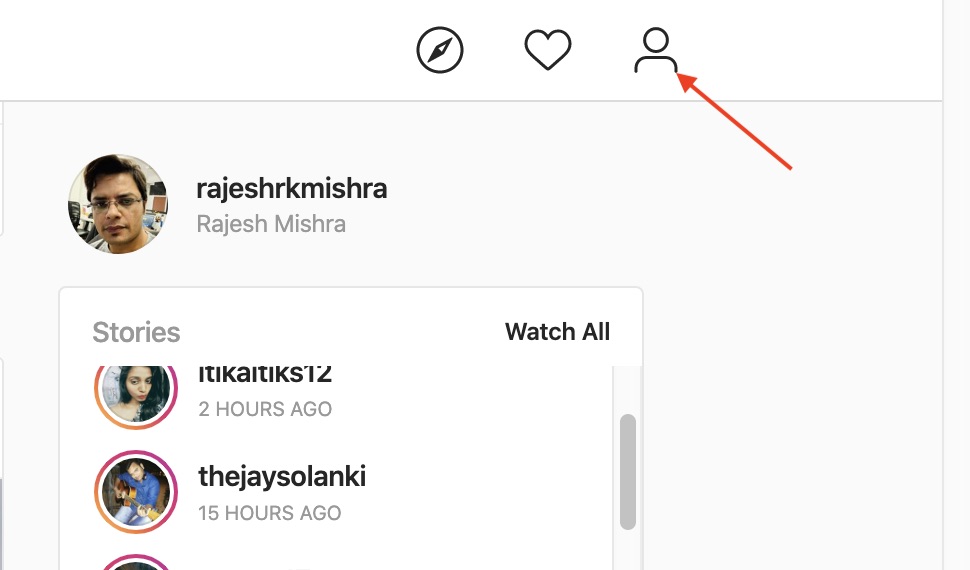
2. Now, click on the Settings icon located near your profile picture.
![]()
3. A menu will pop up on the screen with multiple options, choose Privacy and Security.
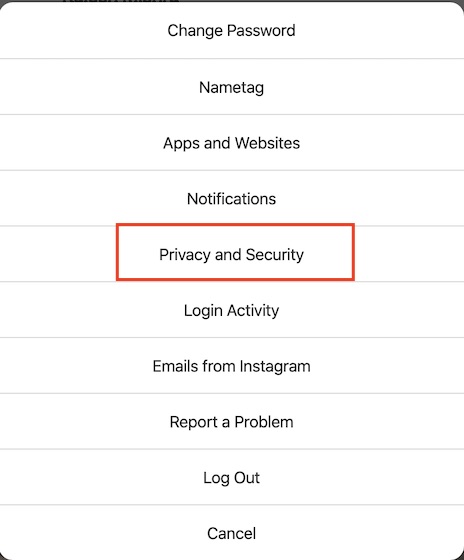
4. Next, scroll down a bit and click on Edit Two-Factor Authentication Setting.

5. Finally, select your preferred security method and then follow the instructions to add the extra layer of safeguard to your Instagram account.

Check out other cool Instagram tricks to enhance your Instagram experience by clicking on the link.
Enable Two-Factor Authentication for Twitter
On iOS and Android Device
1. Open the Twitter app on your mobile device and then tap on your profile photo.

2. Now, tap on Settings and privacy.

3. Next, tap on Account and choose Security.
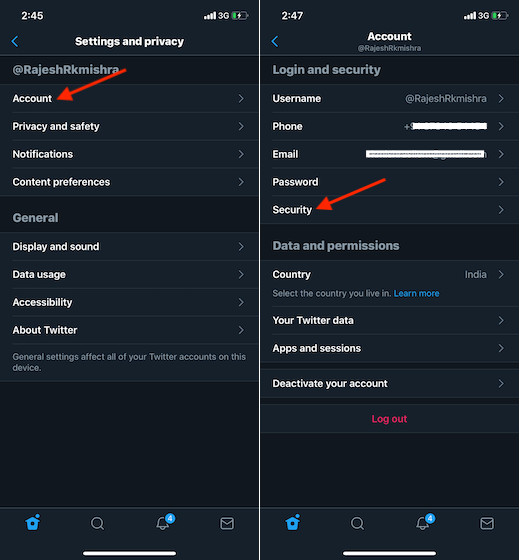
4. Next up, tap on Two-factor authentication. Now, select your preferred authentication option and then follow the instructions to add an additional shield to your data.

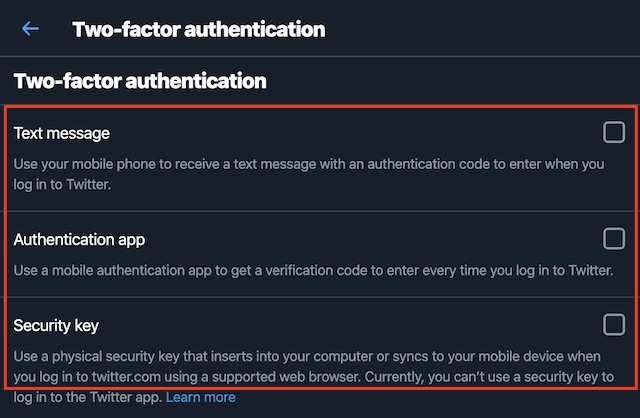
Note: As of now, you can’t use a security key to authenticate your Twitter app. Do note that it doesn’t work on the web either.
On Web
1. Open a web browser on your computer and go to twitter.com. Then, sign in to your account, if you aren’t already. After that, click on the More button (…) in the sidebar.
Note: You can follow the same steps for Twitter’s desktop app to enable 2FA.

2. Now, choose Settings and privacy.
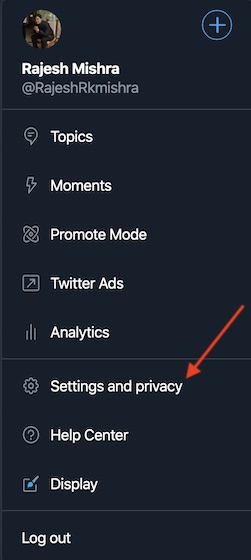
3. Under the Account section, click on Security.
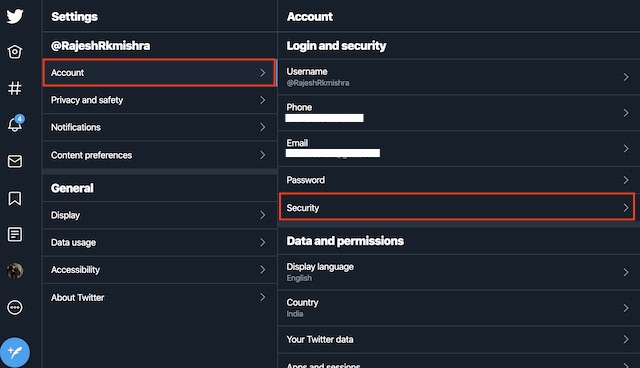
4. Next up, click on Two-factor authentication.
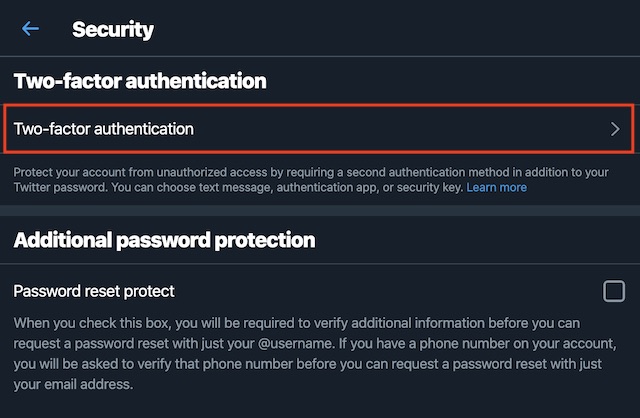
5. Finally, choose the medium through which you want to receive the verification code and then follow the instructions to set up the two-factor authentication for your Twitter account.
Do check out our article on best Twitter tips and tricks. It mentions many nifty tips that can help you get the most out of Twitter.
Safeguard Your Facebook, Twitter, and Instagram Accounts with Two-Factor Authentication…
So, that’s the right way to shield your Instagram, Twitter, and Facebook accounts using 2FA. When the risk is always lingering around, it’s always better to stay guarded against the untoward incidents. As we are talking about improving the security of our personal information, you might want to have a look at the best password managers and VPN apps to further boost the safeguard your data. Finally, share your thoughts on online security and privacy in the comments section below.
from Beebom https://beebom.com/how-enable-two-factor-authentication-facebook-instagram-twitter/

No comments:
Post a Comment