
Contrary to the popular misconception, Microsoft has been shipping a barebone anti-spyware since the Windows XP days. However, after the release of Windows 7, 8 and 10, Microsoft brought a full-fledged antivirus, Windows Defender (now called Windows Security) with support for anti-malware execution, real-time detection, and timely definition update. Having said that, some users don’t find the native antivirus effective and some find it too demanding on the computer resources. Recently, we wrote about how Windows Defender spikes the CPU usage abnormally through the msmpeng.exe process. So, if you are also facing such issues or just want to install an antivirus of your choice then follow our guide and learn how to disable Windows Defender Antivirus on Windows 10.
Disable Windows Defender Antivirus on Windows 10 Using Registry
Here, we will use the Windows Registry tool to disable Windows Defender Antivirus. For this method, make sure you are using the Administrator account before proceeding ahead. Now, let’s begin.
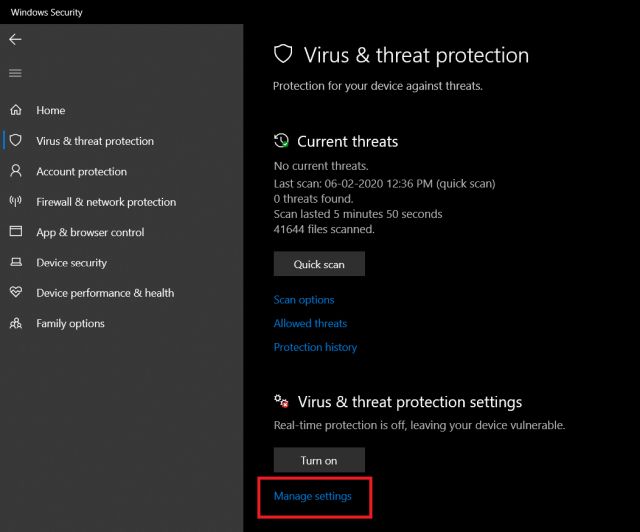
1. First off, open Windows Defender or Windows Security and go to “Virus and threat protection”. Here, click on “Manage Settings”.
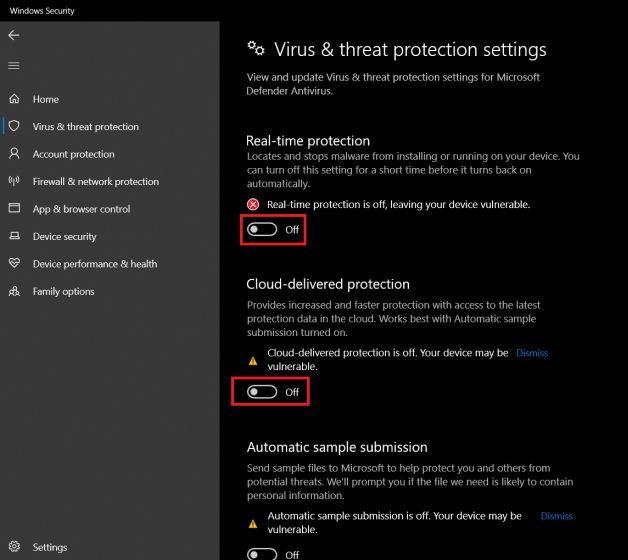
2. After that, disable all the toggles under “Virus and threat protection settings”.
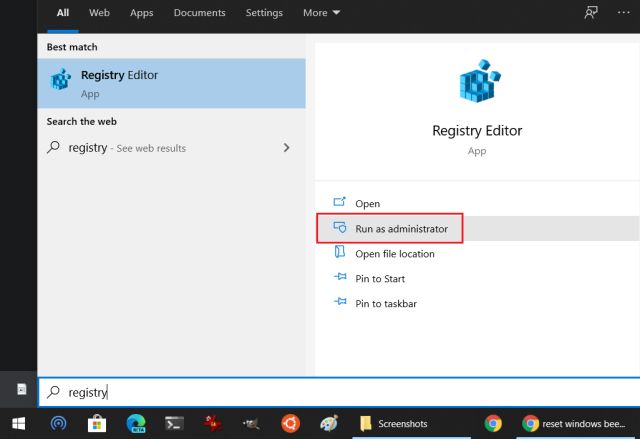
3. Now, search for “registry” in the Windows Search box. After that, click on “Run as administrator” in the right pane.
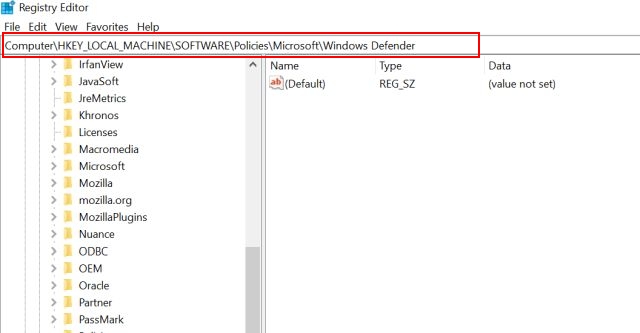
4. Copy the below address and paste it in the Registry address bar and hit enter. You will be instantly taken to the Windows Defender folder.
HKEY_LOCAL_MACHINE\SOFTWARE\Policies\Microsoft\Windows Defender
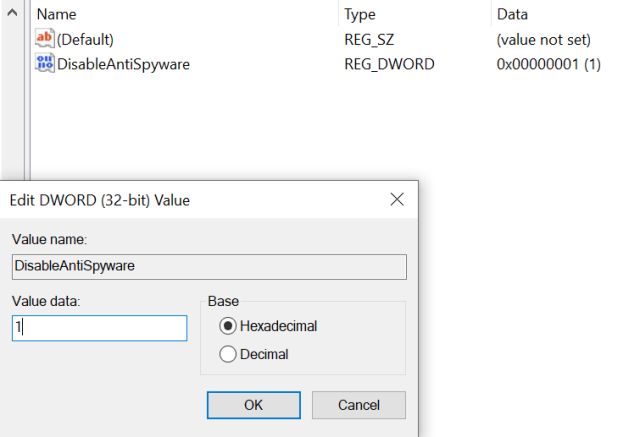
7. Right-click on “Windows Defender” and select New -> DWORD (32-bit) value. Name the file “DisableAntiSpyware” and click on the “Ok” button.

8. Now double-click on the file and change the value to 1. After that, click on the “Ok” button and restart your computer.
9. Finally, open Windows Defender or Windows Security and you will find the antivirus completely disabled. Now you can go ahead and install a third-party antivirus on your Windows 10 PC.
Note: If it does not work in the first try then try for the second time and it will surely work.
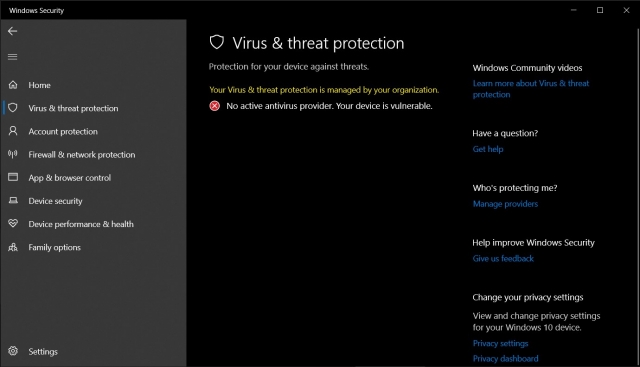
10. In case you want to enable Windows Defender again, simply delete the “DisableAntiSpyware” file from Registry and restart your computer. The native Windows antivirus will start working again.
Disable Windows Defender Antivirus on Windows 10 Using Group Policy
If the Registry hack is not working for you then you can take advantage of Group Policy Editor to disable Windows Defender permanently. However, keep in mind, Group Policy Editor is only available on the Administrator account and PCs running the Windows 10 Pro version. So with all that said, let’s begin.
1. Press the “Windows” and “R” keys at once to open the Run dialog box. Now, type “gpedit.msc” in the search box and hit enter to open the Group Policy Editor.

2. Here, expand the “Administrative Templates” menu under the “Computer Configuration” section.
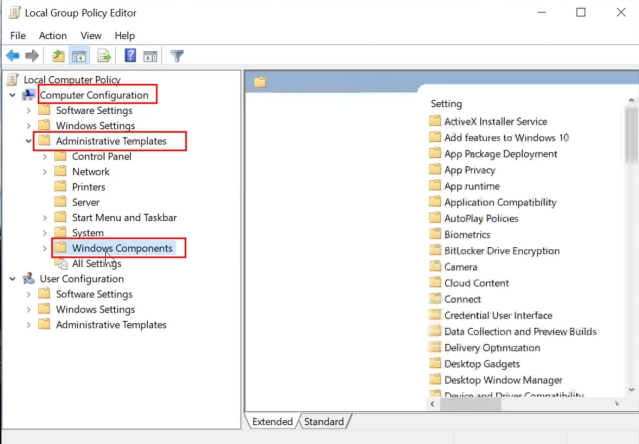
3. Next, expand the “Windows Components” menu and scroll down to “Windows Defender Antivirus”.
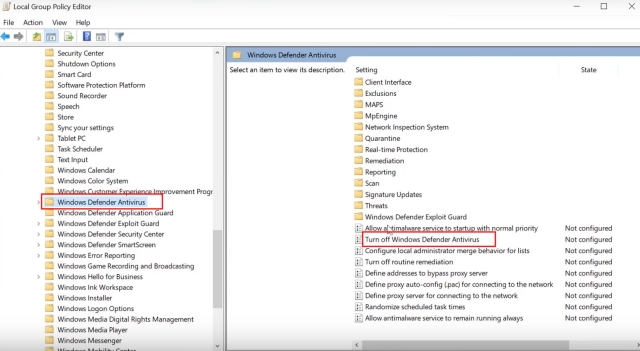
4. Here, double-click on “Turn off Windows Defender Antivirus” and select “Enabled” in the top-left corner. Subsequently, click on the “Apply” and “OK” button.
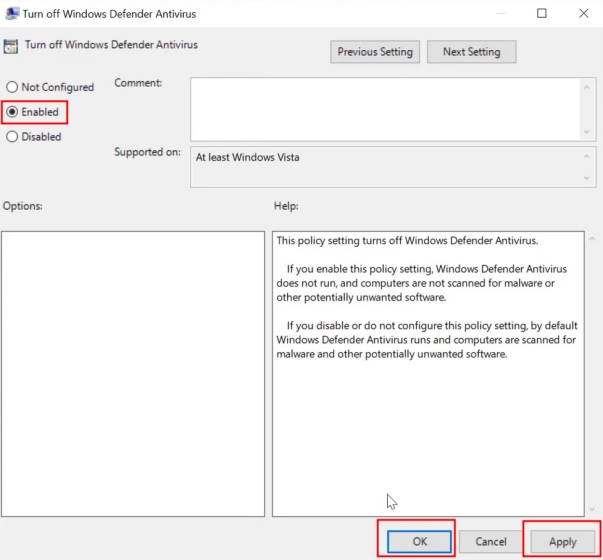
5. Finally, restart your computer and this time, you will find Windows Defender is disabled on your Windows 10 PC.

6. If you wish to enable it again then just open the Group Policy Editor again and select “Not Configured”. That’s it.
Remove Windows Defender Antivirus from Windows 10
So those are the two ways you can remove Windows Defender Antivirus from your Windows 10 PC. While the Registry hack works most of the time, Microsoft sometimes reverses the change after an update. So if you are facing such an issue, go with the more powerful Group Policy Editor which controls the behavior of all system applications on Windows 10 Pro. Apart from that, the older way to disable Windows Defender using Windows Services no longer works so I have not mentioned that method. Anyway, that is all from us. If you found the article helpful, do let us know in the comment section below.
from Beebom https://beebom.com/disable-windows-defender-antivirus/

No comments:
Post a Comment